FAQ
FAQ
The part numbers compatible with the Ultimate MPU Board are listed here. Please understand there may be more that aren't listed, so if you have any questions feel free to ask. This is our up-to-date compiled list. Also, if you see the name of the game on the MPU Board product page list, it will work.
| AS-2518-17 | AS-2518-35 | AS-2518-133 |
| MPU-100 | MPU-200 | AS-3241-1 |
| AS-3241-2 | A084-91638-AB42 | A084-19494-A371 |
| A084-19494-A000 | A084-91624-AA17 | A084-91624-A000 |
| A084-91624-A391 | A084-91624-AA44 | A084-91624-A390 |
| A084-91638-AA40 | A084-91494-A369 | AS-2887-1 |
| AS-2887-2 | AS-2887-3 | AS-2887-4 |
| AS-2887-5 | AS-2887-6 | AS-2887-7 |
| AS-2887-8 | AS-2887-9 | AS-2962-1 |
| AS-2962-2 | AS-2962-3 | AS-2962-4 |
| AS-2962-5 | AS-2962-6 | AS-2962-7 |
| AS-2962-8 | AS-2962-9 | AS-2962-10 |
| AS-2962-11 | AS-2962-12 | AS-2962-13 |
| AS-2962-14 | AS-2962-15 | AS-2962-16 |
| AS-2962-17 | AS-2962-18 | AS-2962-19 |
| AS-2962-20 | AS-2962-21 | AS-2962-22 |
| AS-2962-23 | AS-2962-24 | AS-2962-25 |
| AS-2962-26 | AS-2962-27 | AS-2962-28 |
| AS-2962-29 | AS-2962-30 | AS-2962-31 |
| AS-2962-32 | AS-2962-33 | AS-2962-34 |
| AS-2962-35 | AS-2962-36 | AS-2962-37 |
| AS-2962-38 | AS-2517-35 |
We set out to make The Ultimate MPU Board fit several needs. Our first goal was to produce a MPU board that could handle all the different versions of MPU series boards (yes, a direct replacement) that both Bally and Stern manufactured between 1975 and 1984. Another important goal was for all the games, including free play Bally versions to be installed on one board eliminating EPROM changing. We wanted the new MPU board to have a dipswitch for easy switching between the different games and to eliminate any complicated jumper system. Just think every older game built into one chip on one board.
An additional goal was to make a board that would satisfy the replacement needs of both operators and homeowners/collectors. The consideration for the operator is that they need a MPU board that is rugged enough to run 24/7. The need for the homeowner/collector is a board that can be easily installed and set up and then can be used for years to come without concern. How else could we offer a lifetime warranty no matter if you’re using our board for business or pleasure. And that’s on top of the dozen other improvements like no batteries, overvoltage protection, LED diagnostics, and lots more. Take a look at our products page for more details on each and every feature.
Finally, one of our goals was pricing. Make a board that can sell for under $200 with all of the features that no other product offers.
We believe that we have accomplished all the above goals.
The size of the original board was based upon mid 70's manufacturing techniques and then available components. We chose to make the board as small as possible without requiring any modifications for mounting. The mounting rails have 6 holes, one in each corner and 2 in the middle. What we chose to do was use the lower four holes. The existing cables reach without any strain. Please notice that there are 3 plastic stubs and one screw. Please don't try and put screws in place of the plastic stubs. This could cause a short to some traces. If you need to replace your mounting hardware we sell that on our products page.

By using a PLD chip, we could make the switching of different games as easy as using a dipswitch. This will allow anyone that is not comfortable with electronics to be able to change to any one of over 90 preprogrammed different games plus free play. The PLD contains complex logic that eliminates the need for jumpers and reduces the overall component count. Better yet, no more changing of jumpers or unsoldering wires to change a MPU board from one game to another. Plug and Play at its best.

This jumper will allow you to switch from a 500 kHz clock rate to a 1 MHz clock rate that is used only for the Stern's MPU 200 series. So, you only need to move the clock speed jumpers to the left if you're going to be using the new Ultimate MPU in place of a Stern MPU 200 board.

This is the setting for just about all of the installed games. All of the Bally and the Stern MPU 100's games should have the jumpers set to the right.

This is the jumper setting for just the Stern MPU 200's. If you have a Stern MPU 200 game selected you will move the jumpers to the left.
We feel very strongly about making this an open product. That is why we have posted on this website the schematics, board layouts, manuals and pictures of our products, free of charge. We will continue to update our documentation and support as needed. As for support, you can contact us by either phone or email. We understand that you might have other questions about your game even after purchasing our boards. We pride ourselves on having the best after product support and warranty.
This is accomplished with 2 steps. For simplicity, the free play mode is the same as the regular mode except SW1 (leftmost) on the Game Select dip switch goes up or on. Once the free play mode is enabled, turning off the credit display feature will activate this feature. See our specific game manual to find which of the 32 feature switches is used to turn off the credit display. Use the following steps:

Step 1 – To put your Bally game into free play mode put Switch 1 up on Game Select Switch.
Step 2 – Use the game select dipswitch to pick your game remembering to leave switch 1 on.
Remember the free play setting only works for Bally game.
This example is set for Free Play Mode for the game "Freedom".
Step 3 – Grab your game manual and find the section that talks about setting your feature switches. Find out what switch is used to turn off the credit display. It's different on each game but generally either 16, 20, or 27.
(Notice the switches are read 1 to 32, with 1 being at the bottom)


On-board diagnostics are enabled when the SW1 and SW2 of the Game Select dip switch are on or in the up position. This will allow you to use the features of the Ultimate MPU Test Card. Then consult the Ultimate MPU Test Card manual for instructions on running the different test.
Remember if you didn't purchase The Ultimate MPU Test Card you still have the built in self-test diagnostics using the push button on the door or the switch built into the new MPU board
YES, these games used a -133 MPU board. In these games the zero-crossing signal is derived from the GI buss rather than the solenoid bus. The Ultimate MPU works with both versions automatically making it universal.
When you turn on the game the Self-Test light will flash twice, than you will see a pause, and then it will finish up with 6 more flashes, at which point the self-test light will remain on but very dim.
Just a note, Baby Pacman has a little bit of a different Self-Test sequence.
Here are several reasons to do a memory clear. This is a software routine that we wrote to completely clear out any bad data recorded in the memory registers. So when
do you want to do a memory clear; if you have some strange things going on with the displays, switches, or even the solenoids. Easy to do and quick Step 1: Put the game select switch as shown and then turn on the game. After about 2 secs everything is erased including your bookkeeping scores. Step 2: Reprogram the game select switch to your desired game including free play. Step 3: Reprogram your bookkeeping high scores and in some cases sound settings.
No, at this time we don't have free play settings for Stern games.
The test points are located in the lower left corner of the board.

When you need to measure the voltage on the Ultimate MPU Board you have some very useful test points that make this very easy to accomplish. TP1 (5v IN) is for the red lead, positive voltage. TP3 (Gnd) is for the black lead or ground. Notice in the picture below not to use the ground strap for the black lead. The reason for this is if your ground is bad on your MPU connector you won't catch it if you use the ground strap. Any 5v reading of 4.85vdc or less is something that needs to be repaired.

One other thing to check while you are doing this test is to check your AC voltage leakage. What can happen on the old original Solenoid Driver boards is the main capacitor or the regulator can go bad. Keeping the leads of your voltmeter on the same test points that you just measured, switch your meter to AC mode. If that voltage is over 100mv AC then consider replacing the Solenoid Driver board
The feature switches on the old MPU are the same as the switches on the Ultimate MPU Board. If you have your old board you can make them the same if you don't plan on making any changes. The numbers read from 1 to 32 from bottom to top. You can see that there are numbers on the right side of the 4 dipswitches for your convenience.
NO, you don't need to worry about that ever again when you purchase the Ultimate MPU Board. As long as your game is on the list of supporting games every game on that list is already programmed into your board. You will never need to purchase new programing chips, have to wait for them to show up, and then have to install them.
The overvoltage protection circuit keeps watch of the +5vdc at all times. If something goes wrong or you have a voltage spike the circuit will protect the microprocessor and support chips from being damaged. Once this circuit turns on you must turn the game off and then on to reset it. If it continues you need to do some more troubleshooting to figure out what is causing the fault.
What you want to do is check the +5vdc test point. See the FAQ on “What is the correct way to test the +5vdc on the Ultimate MPU bord”.
Other things about this circuit are if the +5vdc is too low or there is a high amount of AC voltage leakage from the original Solenoid Driver board. Another possibility is the +12vdc is missing on the MPU board which comes in to J4 pin 12.
Works in the Following Bally Games:
- Baby Pac
- Black Jack
- Black Pyramid
- BMX
- Centaur
- Centaur II
- Cybernaut
- Dolly Parton
- Eight Ball
- Eight Ball Deluxe
- Eight Ball Deluxe Ltd
- Elektra
- Embryon
- Evil Knievel
- Fathom
- Fireball II
- Fireball Classic
- Flash Gordon
- Freedom
- Frontier
- Future Spa
- Gold Ball
- Grand Slam
- Granny and the Gators
- Harlem Globe Trotters
- Hotdoggin
- Kiss
- Kings of Steel
- Lost World
- Mata Hari
- Medusa
- Mr. & Ms Pacman
- Mystic
- Night Rider
- Nitro Ground Shaker
- Paragon
- Playboy
- Power Play
- Rapid Fire
- Rolling Stone
- Silverball Mania
- Six Million Dollar Man
- Skate Ball
- Space Invaders
- Speakeasy 2 & 4 Player
- Spectrum
- Spy Hunter
- Star Trek
- Strikes and Spares
- Super Sonic
- Vector
- Viking
- Voltan
- X's and O's
- Xenon
Works in the Following Stern Games:
- Ali
- Big Game
- Catacomb
- Cheetah
- Cosmic Princess
- Dracula
- Dragonfist
- Flight 2000
- Freefall
- Galaxy
- Hot Hand
- Iron Maiden
- Lazer Lord
- Lectrnamo
- Lightning
- Magic
- Memory Lane
- Meteor
- Nine Ball
- Nugent
- Orbitor 1
- Pinball
- Quicksilver
- Seawitch
- Split Second
- Star Gazer
- Stars
- Stingray
- Trident
- Viper
- Wild Fyre
Works in the Following Other Games:
- Black Sheep Squadron
- New Fathom
- New Vector
- Sexy Girl
- Big Ball Bowling
- Big Bat Baseball
- Black Beauty Shuffle
- Genesis Puck Bowler
The best way to wire up the Stern Sound Board to the J5 connector is find pin 1 of the connector on the sound board and plug that into Pin 1 of the MPU board. Than repeat this process for the next connector which will be pin 17 to pin 17 on the MPU board. When your completed, you will have 2 spare pins on the far left on J5 MPU board which are used on some very rare games.


Yes, you can use a combination of LED's or old style filament bulbs. Just remember if your using any LED's you will need to connect the jumper wire.
Yes, that's the main reason people purchase the board is to solve the flicker issue. Another issue that the board resolves is if the LED's are not turning off.
First off you only need to connect the jumper wire if you are planning on using LED bulbs. If you're not switching over to LED bulbs just put the jumper wire to the side for future use and install the new board.
If you are going to use LED's, the reason you need to use the jumper wire is the SCR's have a higher turn on voltage because they were designed to work with the older filament light bulbs. LED's have a very low turn on voltage which can make the LED's look like there flickering or staying on if used on an older style lamp driver board. Your new board and the jumper will fix this issue.
You want to identify a control lamp on the back box. The easiest way is to put the game into self-test mode. Make sure your lamp driver board is connected up and turn on the game. Go ahead and push the self-test button. Just push the button once. The lamps should start flashing on and off. Identify one of the lamps on the back box that's flashing on and off. This is a control lamp. Now that you have identified a control lamp you now need to attach the bare end of the jumper wire. Turn the game off again.
So looking at the lamp socket that you have identified, it should look something like the picture below. Look for a fat solid color wire and a smaller striped wire. Take the wire that you just installed on TP13 on the LED/Lamp Driver Board and let's attach the other end of the wire which has already been stripped for your convenience. Wrap the bare wire around the braided wire that is attached to the fatter solid wire side. Now that you have the one side attached to the braided wire go ahead at this time and insert the terminal side of the jumper wire on TP13. You're done.

Works in the Following Bally Games:
- Black Jack
- Black Pyramid
- BMX
- Centaur
- Centaur II
- Cybernaut
- Dolly Parton
- Eight Ball
- Eight Ball Deluxe
- Eight Ball Deluxe Ltd
- Elektra
- Embryon
- Evil Knievel
- Fathom
- Fireball II
- Fireball Classic
- Flash Gordon
- Freedom
- Frontier
- Future Spa
- Grand Slam
- Harlem Globe Trotters
- Hotdoggin
- Kiss
- Kings of Steel
- Lost World
- Mata Hari
- Medusa
- Mr. & Ms Pacman
- Mystic
- Night Rider
- Nitro Ground Shaker
- Paragon
- Playboy
- Power Play
- Rapid Fire
- Rolling Stone
- Silverball Mania
- Six Million Dollar Man
- Skate Ball
- Space Invaders
- Speakeasy 2 & 4 Player
- Spectrum
- Spy Hunter
- Star Trek
- Strikes and Spares
- Super Sonic
- Vector
- Viking
- Voltan
- X's and O's
- Xenon
Works in the Following Stern Games:
- Ali
- Big Game
- Catacomb
- Cheetah
- Cosmic Princess
- Dracula
- Dragonfist
- Flight 2000
- Freefall
- Galaxy
- Hot Hand
- Iron Maiden
- Lazer Lord
- Lectrnamo
- Lightning
- Magic
- Memory Lane
- Meteor
- Nine Ball
- Nugent
- Orbitor 1
- Pinball
- Quicksilver
- Seawitch
- Split Second
- Star Gazer
- Stars
- Stingray
- Trident
- Viper
- Wild Fyre
Works in the Following Other Games:
- Black Sheep Squadron
- New Fathom
Yes, the larger surface mount SCR’s are equivalent to MCR106’s. When mounting them make sure the lettering on the component is facing the part that you have removed.
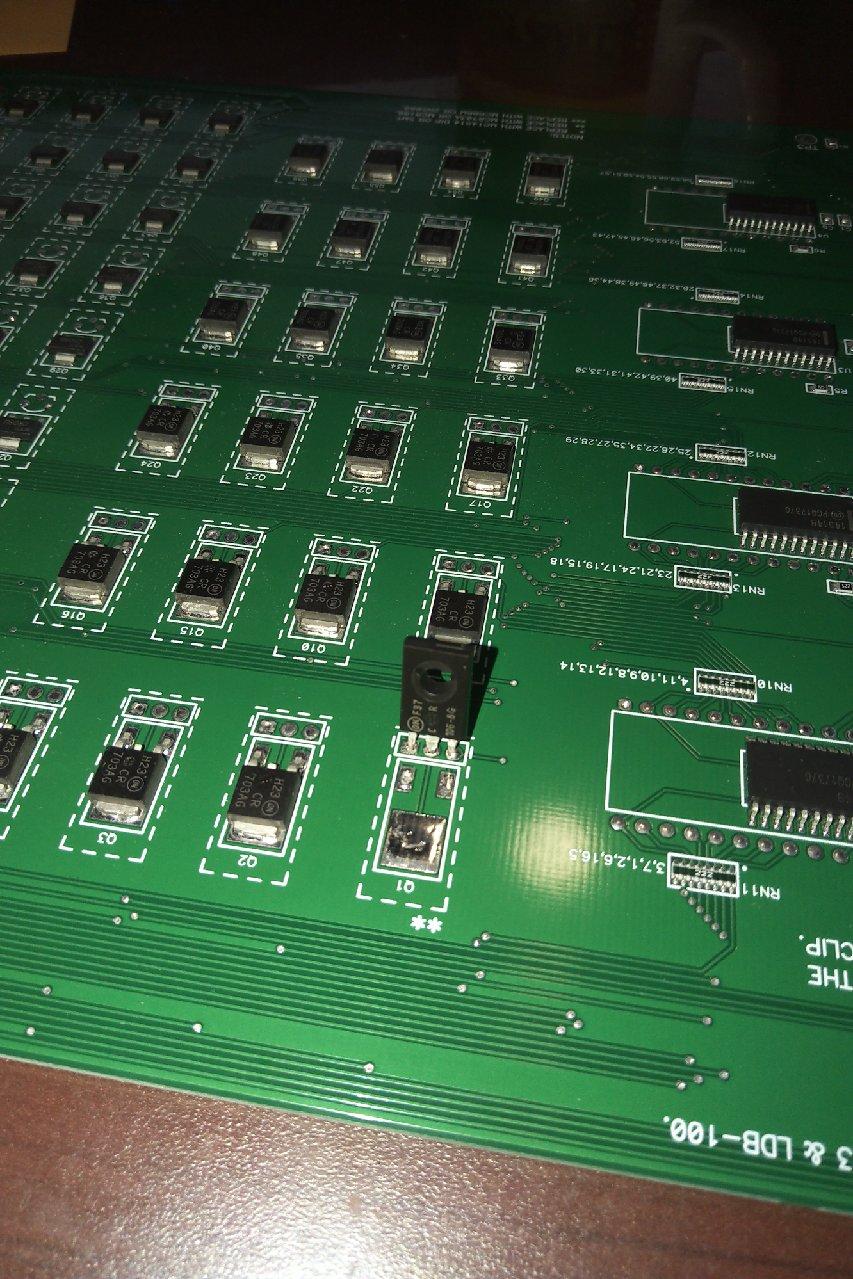

To remove the surface mount part, I suggest that you clip the 2 legs and then using a soldering iron, remove the 2 legs and then the body of the part. De-solder the 3 thru-hole holes and mount the new part.
As for the smaller surface mount part, the equivalent replacement part is 2N5060. This part installs just as the pattern on the part shows.
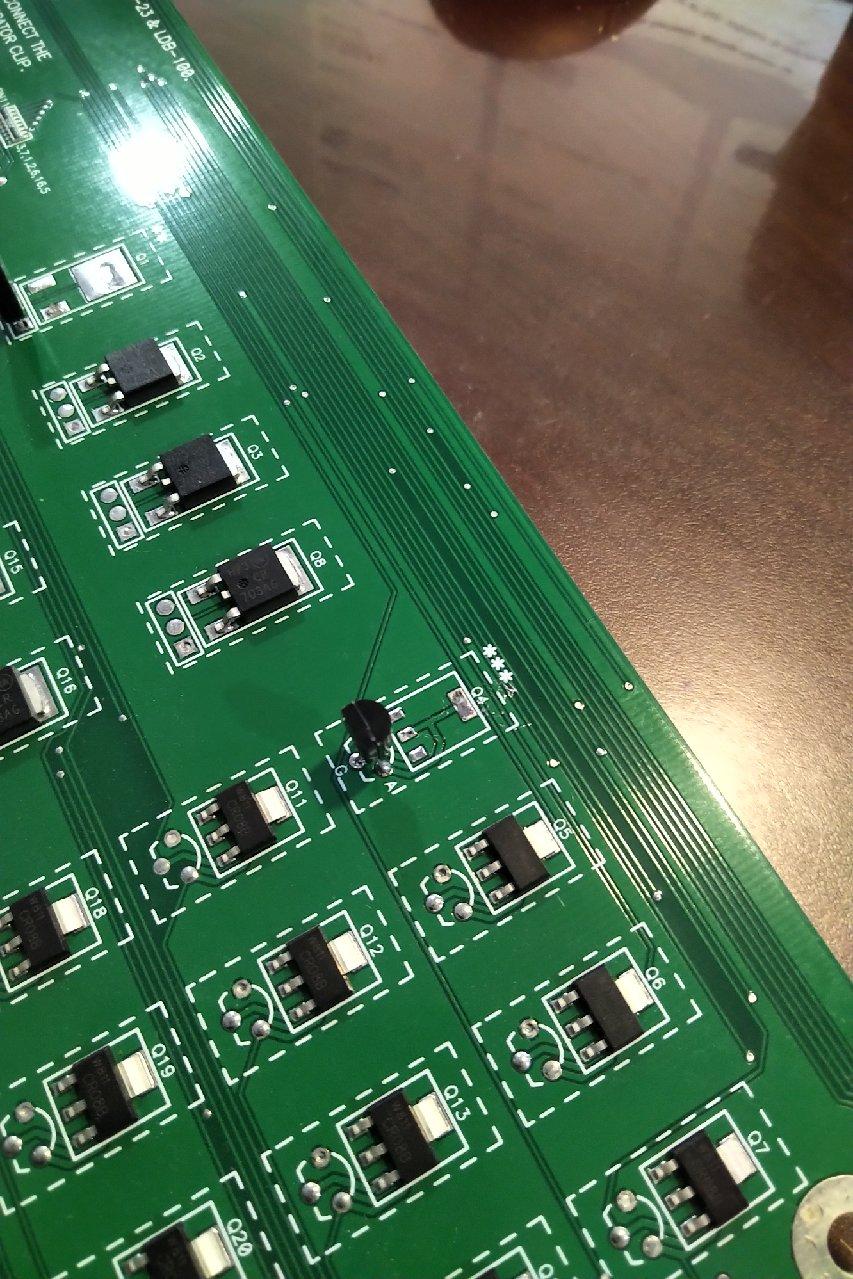
To remove the smaller surface mount SCR’s, again I suggest clipping the 3 legs and then using your soldering iron to take each piece off the board.
But don’t forget, all of my boards have lifetime warranties, and you can request an RMA# and I will do the repairs for free (Return shipping fee applies).
One of the coolest features on our Solenoid Driver Board (SDB) that others don't have is the coil protection system. With the original board or even our competition if your coil shorts out or your system locks up, you will burn up the transistor, coil, or even the board itself. What our protection system buys you is the MOSFET's are protected by a circuit that constantly looks at the current. If the current rises to a danger point before it starts to burn things up it shuts just that coil down. Than the LED that is associated with the coil will start flashing fast to tell you that circuit is in protection mode. No damage to the board. This is again why we are the only company producing boards with a lifetime warranty.
The reason for the cyclone LED's is to let you know that the CPLD code is running which is a good indiction that your +5vdc and 3.3vdc is correct. Remember that doesn't mean that the +5vdc is matrixing to each board correctly because you could still have bad connectors or pins. Plus we think it looks cool.
Works in the Following Bally Games:
- Black Jack
- Black Pyramid
- BMX
- Centaur
- Centaur II
- Cybernaut
- Dolly Parton
- Eight Ball
- Eight Ball Deluxe
- Eight Ball Deluxe Ltd
- Elektra
- Embryon
- Evil Knievel
- Fathom
- Fireball II
- Fireball Classic
- Flash Gordon
- Freedom
- Frontier
- Future Spa
- Grand Slam
- Harlem Globe Trotters
- Hotdoggin
- Kiss
- Kings of Steel
- Lost World
- Mata Hari
- Medusa
- Mr. & Ms Pacman
- Mystic
- Night Rider
- Nitro Ground Shaker
- Paragon
- Playboy
- Power Play
- Rapid Fire
- Rolling Stone
- Silverball Mania
- Six Million Dollar Man
- Skate Ball
- Space Invaders
- Speakeasy 2 & 4 Player
- Spectrum
- Spy Hunter
- Star Trek
- Strikes and Spares
- Super Sonic
- Vector
- Viking
- Voltan
- X's and O's
- Xenon
Works in the Following Stern Games:
- Ali
- Big Game
- Catacomb
- Cheetah
- Cosmic Princess
- Dracula
- Dragonfist
- Flight 2000
- Freefall
- Galaxy
- Hot Hand
- Iron Maiden
- Lazer Lord
- Lectrnamo
- Lightning
- Magic
- Memory Lane
- Meteor
- Nine Ball
- Nugent
- Orbitor 1
- Pinball
- Quicksilver
- Seawitch
- Split Second
- Star Gazer
- Stars
- Stingray
- Trident
- Viper
- Wild Fyre
Works in the Following Other Games:
- Black Sheep Squadron
- New Fathom
Let me first go through the schematic side of this question.
There are 8 signal lines that come off the J4 connector on the MPU board. Four of the lines are binary address outputs for the momentary solenoids and operate solenoids 1-14 and 16. The other four signal lines are for the continuous solenoids 15, 17-19, and are just individual outputs.
MPU Board Schematic:

Solenoid Driver Board Schematic:

J4 MPU Connector Pins:

Let’s say you want to fire Solenoid Q5. In binary that would be 0101 as you can see in the chart above. That means J4 pins 1 and 3 would need to be high and pins 2 and 4 would need to be low. Now think what would happen if one of those lines was not making a good connection because of a dirty pin or a broken wire. Using the same solenoid #5 example, let’s assume pin 2 has a broken wire. The MPU board thinks it is sending a command to turn on Solenoid #5, but the SDB is getting 0111. You might be asking if the wire is broken why is Pin 2 high. The pins are tied high on the SDB so the solenoid circuit will take this as a high because it can’t be held low. And that means solenoid Q7 will pop instead of Q5.
One other thing about this - lots of times I will have customers say they have done a continuity test on the pins, and everything looks good. Two things with that, one is shoving a probe into the connector is not a good test. This might help make the connection and the other thing is having continuity doesn't mean the wire can handle current. There might be just one strand of wire connected to the pin in the connector which will show continuity but will never be able to handle current. So just replacing the pins in these connectors sometimes just needs to be done so you know things are right.
The last thing to mention is the continuous solenoids, Q15, Q17-19. Q15 is the Flipper Relay and Q19 is the Coin lockout. Q17 and 18 will be different on all games and sometimes not even used. And again, you can see how a broken wire will cause them to be on.
Xpin makes this board and since we like the board there is no reason to remake this product. It’s easy to install and doesn’t require any special tools.
No, it has a one-year warranty, but it’s so well made you shouldn’t have any issues for years to come.
You can contact Allteksystems like usual or ask Brett directly at support@xpinpinball.net
It's easy to say you should order up all 3 of my boards as a package in what I call the "Trifecta". But the truth is you only need what's not working. Now lots of people do purchase them all to keep there investment new and fresh plus have something that offers you a lifetime warranty. But the 2 most important boards are the Ultimate MPU and Solenoid Driver boards. These 2 boards are truly the heart of your game and if there working flawlessly, the rest of the game has a better chance of going for another 40 years.
Remember after replacing your boards you still have a 40 year old game with 1 or more new boards. Connector pins go bad and corrode. Wires become brittle and break. There are 2 style of connector pins; .100 spacing and .156 spacing. You can purchase these at many of the distributors here.
You can watch this video below to learn more about how to repin connectors and fix broken connections.
The following video offers another option using a crimping tool.
All orders are shipped via UPS ground or UPS international. No P.O. Boxes Please. Faster delivery is available on request. C.O.D. available. Dealer pricing is also available. Please email us for details.
You may also pay by check. Send to: Allteksystems, 1350 Villaverde Lane, Charlottesville, VA 22902.
USA UPS Ground $8.95 - Canada UPS Ground $18.00 - International UPS $42.00
International doesn't include duties or taxes.
To track your order status and shipping, please visit the order tracking page here.